Blog

B&T Free Hoodie Hack – Snap Panel Front

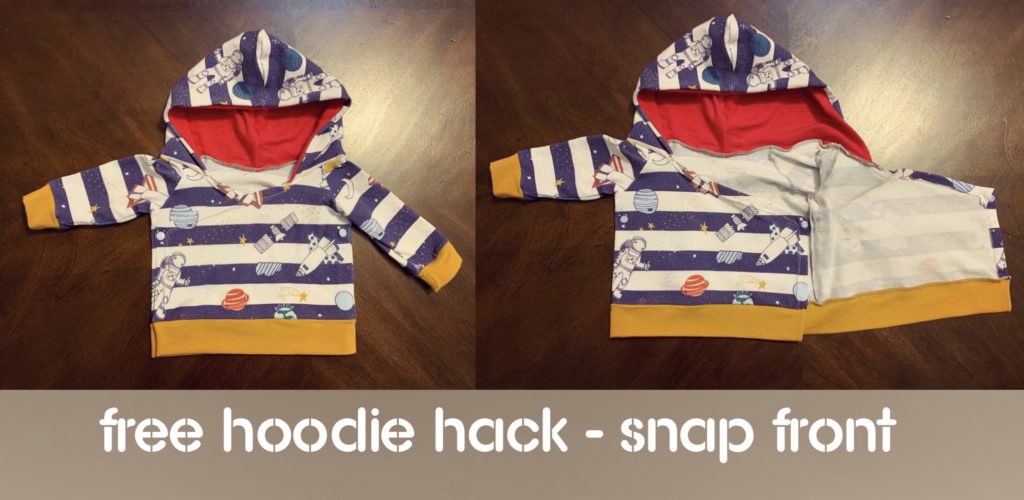
I’ve just finished making a super cute baby modification to the Brindille & Twig Free Raglan Hoodie pattern, which changes the pullover design to have a front panel that snaps. Pictured is the 0-3 month size.

Only modifications to cutting the pattern are to:

  1. Cut an additional front panel
  2. Measure the length of the bottom of your front panel, multiply by 3, and cut your bottom band that length instead of the recommended length

When I got to Step 4 of the pattern (to attach the sleeves, front, and back panels), I started with one front panel, attached a sleeve, attached the back, attached the other sleeve, then attached the other front panel, so instead of a closed ring of pieces, it was an open-ended chain.

Step 5 worked as designed in the pattern, but only attach the side seam for the front panel that is attached to that sleeve (leave the other panel unattached; see top picture.)

Step 6, I attached the wrist cuffs as described. For the waistband, I folded my extra long strip (as mentioned above) in half on the edges, right sides together, and sewed the short ends closed independently. I skipped to step 7, and attached the waistband after.

Step 7, I made the lined hood as described. When it comes to the pinning part, I pinned the back of the hood (where the seam is) in the center of the back panel, and then pinned the rest of the hood where it fell, around the rest of the neck opening. As you can see in the picture, it won’t come close to overlapping, so I removed the pins on the ends of the hood (to about where the raglan sleeve seams were), and folded the opposite corner of the front panel down, and top-stitched a 1/2″ seam down that angle, and down the open edge of each front panel.
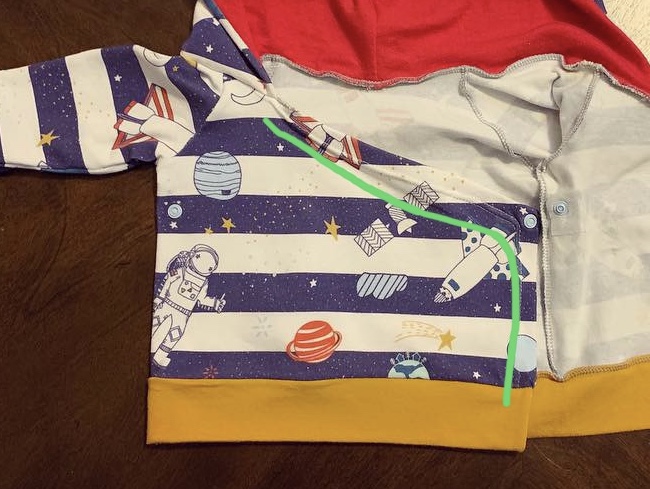
Once I had the raw edges folded under and sewn, I trimmed the excess fabric away on the back side that was folded under (if I were to make this pattern repeatedly, I would probably cut my front pattern piece in that shape and cut 2 mirrored pieces, but it’s easy enough to do this as you go that it isn’t necessary). Then I re-pinned the hood, just letting the edges end where they fall, and sew the hood on. One thing to note; since I was using a serger to attach the hood, I wish I had paid more attention to stop sewing right where the hood edge ended, and not keep going past onto the neckline, because that seam is visible from the front. But, if you hadn’t noticed it already, probably no one else will either. ?

I then attached the waistband by turning the corners right-side out, and pinned the band to the bottom of the jacket and sewed down the long side to attach it in a straight line.

For the snaps, I used 2 KAM size 16 snaps, and positioned them on the corners where the front panel seam turns. I did put a 1″ square of fusible interfacing on the back of the panels that were just one layer (my hoodie was made with cotton lycra, so pretty lightweight/stretchy). The other side of the snap that was through the double-thick hem, I didn’t worry about stabilizing.

Hopefully that description helps you if you attempt this hack! Let me know if you have any questions.
21 Day Fix – Workout Charts

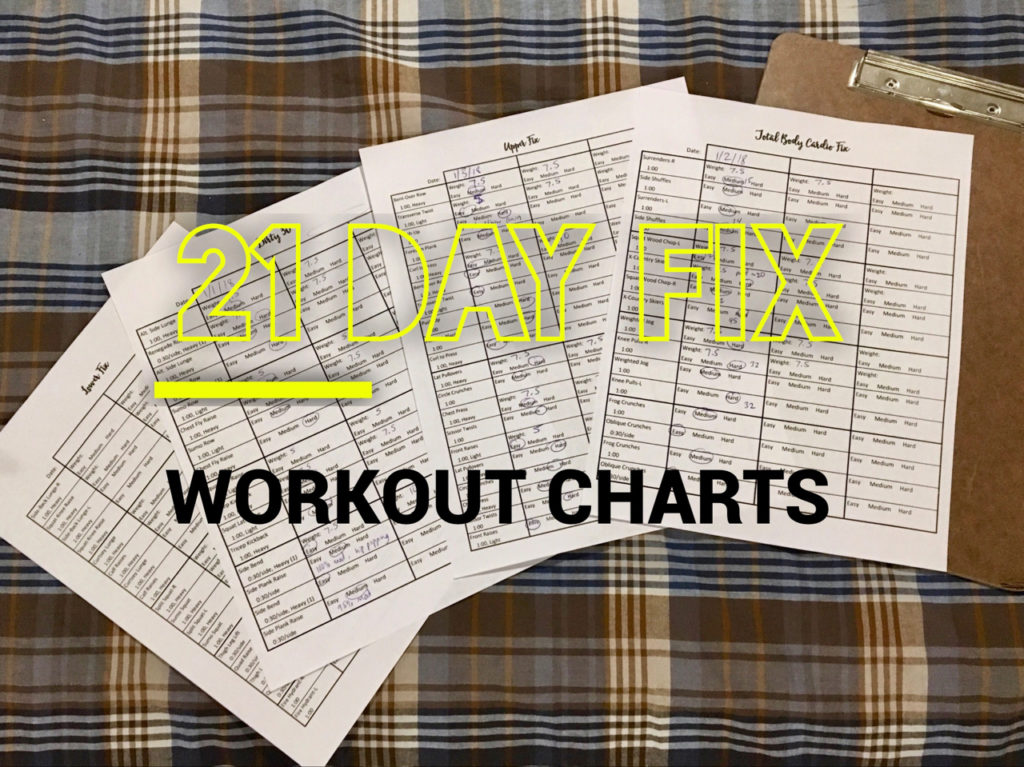
When I started to repeat the 21 day fix workouts after week 3, I realized that I was ready to move up on the weights for some moves, but not others. I also had trouble remembering to count my reps the first time through the sets. I created these charts to help my track my weights and my progress week over week. Since I have adjustable weights, this is especially helpful to get them set up for the upcoming exercise knowing in advance when I need to change them.

Sounds cool. How do I use the charts?

  1. Before you work out, decide what your weights will be for each exercise and write it in on the blanks. I have the moves labeled “light” and “heavy” where that applies, to help you out. I assumed you would be using the same weight for both reps of the move on that day, so you only have to write it down the first time per move.
  2. After each move, mark a quick circle on the chart for how that went. Easy? Medium? Hard? Halfway between Medium and Hard? Did you modify for 15 seconds? Jot that down in the blank space if you want. Did you do 24 reps? Awesome. Jot that down if you want.
  3. After your workout, look over how things went. Did both sets go Easy for a move? Fill in the weights for the upcoming week (higher if you’re ready) so it will be ready for you next week.

Why are there only 4 pages?

I only made the charts for the days that use weights. If you like these charts and would like me to make Easy/Medium/Hard grids for the other workouts, let me know and I’ll be happy to post them.

Download the charts here!


21 Day Fix – Meal Planning Week 3

It’s the home stretch now! I’ve made it through the first two weeks. I had my first “bad” day on Friday; two catered (fried) meals at work, a cookie trade, and holiday party with drinks O_O. Hopefully that one day won’t set me back too much. My chocolate Shakeology came in last week, and I LOVE it. I expected to tolerate it, but it’s actually delicious. It’s like eating dessert first every day. That’s my kind of diet!!

Recipes

This week I will be using:

Daily Plan

Monday:

  • Breakfast: ShakeologyR
  • Snack: 2 eggs, almondsRB
  • Lunch: Beef & vegetable stew, orangesRGP
  • Snack: Carrots & cucumbers, pumpkin seedsGO
  • Dinner: Freebirds (salad with chicken, black beans, tomatoes, corn salsa)RGY
  • Snack: Strawberries, dark chocolate chipsPY

Tuesday:

  • Breakfast: ShakeologyR
  • Snack: Yogurt, almondsRB
  • Lunch: Teriyaki beef and broccoli, orangesRGP
  • Snack: Carrots & cucumbers, pumpkin seedsGO
  • Dinner: Shrimp scampi with whole wheat pasta and tomatoesRGYY
  • Snack: BerriesP

Wednesday:

  • Breakfast: ShakeologyR
  • Snack: 2 eggsR
  • Lunch: Beef & vegetable stew, 2 tangerinesRGP
  • Snack: Carrots & cucumbers, pumpkin seedsGO
  • Dinner: Thai pork meatballs, green beans, whole wheat pastaRYG
  • Snack: Berries, Mark’s birthday cake!PYB

Thursday:

  • Breakfast: ShakeologyR
  • Snack: Yogurt, almondsRB
  • Lunch: Teriyaki beef and broccoli, brown rice, 2 tangerinesRYGP
  • Snack: Carrots & cucumbers, pumpkin seedsGO
  • Dinner: Teriyaki beef and broccoli, brown riceRYG
  • Snack: StrawberriesP

Friday:

  • Breakfast: ShakeologyR
  • Snack: 2 eggsR
  • Lunch: (Work-catered) + 2 tangerinesRYGBP
  • Snack: Carrots & cucumbers, pumpkin seedsGO
  • Dinner: Chicken lentil stew with bacon and carrotsRGY
  • Snack: StrawberriesP

Saturday

  • Breakfast: ShakeologyR
  • Snack: Yogurt, 2 tangerinesRP
  • Lunch: Lean Cuisine, almondsRYGB
  • Snack: Carrots & cucumbers, pumpkin seedsGO
  • Dinner: Stuffed bell peppers with quinoaRYG
  • Snack: StrawberriesP

Sunday

  • Breakfast: ShakeologyR
  • Snack: 2 eggsR
  • Lunch: Salad, 2 tangerines, yogurtGPR
  • Snack: Christmas Eve dinner!GOY
  • Dinner: ^^ Make good choices!RGBY
  • Snack: StrawberriesP

Adding SASS to the dotnet React template

Out of the box, ASP.NET’s JavaScriptServices app generator has gotten pretty good. It gives you a decent starting point (if you like TypeScript) and even has a react-redux template. It doesn’t, however, come with any css extensions like SASS. There’s a not very user-friendly description in the docs of how to add it, but here’s the quick and dirty of how to add SASS to your project.

Disclaimer: This will not include hot module reloading for the scss files. ? This is very lame, but it’s discussed here that it’s better to build your css the same way in dev and prod (rather than using different loaders for the two environments), so until there’s a valid loader that can do both, this is the method they recommend.

  1. Install the required modules
    Using npm:

    npm install --save-dev node-sass sass-loader
  2. Update the webpack config(s)
    Find the rules block in your webpack config that are testing for /\.css$/ files. Modify that line to:

    { test: /\.s?css$/, use: ExtractTextPlugin.extract({ use: isDevBuild ? 'css-loader!sass-loader' : 'css-loader?minimize!sass-loader' }) }
  3. Rename your file(s)
    The default app has a file called “site.css” in the /css folder. Rename this to “site.scss”.
  4. Update your reference
    Wherever you are including your css into your app (by default, it’s in boot-client.tsx), change that reference to match your new file name:

    import './css/site.scss';

    Psst: DON’T change the file name in your webpack.config passed to the ExtractTextPlugin; that is specifying the name of the output file.

  5. Run your app, and load in a browser
    Run on the command line by using “dotnet run”, then open a browser to localhost:5000, or whichever port is specified. If your app is building in Production mode (it will say in the blurb when it boots up), then you can set the environment flag by running:

    SET ASPNETCORE_ENVIRONMENT=Development
  6. Add some SASS 
    At the top of your new .scss file, test it out by adding a variable, and then abuse that variable:

    $hideous-color: #f0f;
    
    body {
        background-color: $hideous-color;
    }
  7. Reload your app in the browser

You are now cookin’ with SASS. Terrible pun intended.

21 Day Fix – Meal Planning Week 2

Woo! Made it through week one, and actually stuck to the plan! (Except for a couple slices of pizza at lunch on Saturday). Here’s what’s on the menu for week 2:

Monday:

  • Breakfast: 2 eggsR
  • Snack: Yogurt, 2 tangerines (still don’t have my Shakeology yet?)RP
  • Lunch: Turkey burger patty with monterrey jack cheese, sweet potatoes RYB
  • Snack: Dark chocolate chips, carrots & celery, peanutsYGO
  • Dinner: Salmon, spinach, tomatoesRGG
  • Snack: StrawberriesP

Tuesday:

  • Breakfast: Shakeology (hopefully! ?)R
  • Snack: 2 eggs, pumpkin seedsRO
  • Lunch: Meatloaf, roasted carrots and potatoesRGY
  • Snack: Blueberries, carrots & celeryPG
  • Dinner: Beef & vegetable stewRG
  • Snack: Dark chocolate chips, almondsYB

Wednesday:

  • Breakfast: ShakeologyR
  • Snack: Yogurt, almondsRB
  • Lunch: Beef & vegetable stew, 2 tangerinesRGP
  • Snack: Carrots/celery, pumpkin seeds, dark chocolate chipsGOY
  • Dinner: Verde chicken, quinoa, spinachRYG
  • Snack: StrawberriesP

Thursday:

  • Breakfast: ShakeologyR
  • Snack: 2 eggs, blueberriesRP
  • Lunch: Verde chicken, quinoa, spinachRYG
  • Snack: Carrot/celery/cucumber, pumpkin seedsGO
  • Dinner: Steak, roasted brussels sprouts, sweet potatoesRGY
  • Snack: Strawberries, almondsPB

Friday:

  • Breakfast: ShakeologyR
  • Snack: YogurtR
  • Lunch: (Work-catered) Make good choices!RYG
  • Snack: (Holiday party) ^^GOP
  • Dinner: Eat out at Verts (grilled chicken, salad, hummus, sweet potato fries)RGBY
  • Snack: StrawberriesP

Saturday

  • Breakfast: ShakeologyR
  • Snack: 2 eggs, 2 tangerinesRP
  • Lunch: Eat out at Pita Fusion (Grilled chicken wrap, hummus, veggies, cheese) RYGB
  • Snack: Pumpkin seeds, carrots/celeryOG
  • Dinner: Salmon, potatoes, broccoliRYG
  • Snack: StrawberriesP

Sunday

  • Breakfast: Shakeology, whole wheat waffleRY
  • Snack: Yogurt, pumpkin seedsRO
  • Lunch: Chicken burrito bowlRGBY
  • Snack: Carrots/celery, berriesGP
  • Dinner: Beef & vegetable stewRG
  • Snack: StrawberriesP

Recipes:

Mostly off the cuff and leftovers this week, but I will be trying: